Docker basics
May 27, 2019

What Docker is
Docker is a container virtualization technology, allowing running applications in the isolated environments simultaneously in a single machine.
The main benefits are the following:
- Quick developer onboarding (no need for manual installation and configuration of environment)
- Environment isolation between applications
- Consistency between environments
- Fast deployment
- Quick startup and shutdown
As Docker does not virtualize the whole operating system, but the application environment (libraries, binaries, configuration) it runs fast and with low footprint and is extremely useful for building 12-factor apps.

Source: https://medium.com/@satish1v/docker-for-net-developers-e73961b24e9d
Installing Docker
There are different versions of Docker: CE (Community edition) and EE (Enterprise Edition). For personal use we will use Community Edition.
Docker can be installed from the official repositories. The instruction for Ubuntu: https://docs.docker.com/install/linux/docker-ce/ubuntu/
It is beneficial to add your user to the docker group after install and perform other Post-installation actions.
The installation options for other operating systems are also available in Docker website.
What a Docker image is
Image is a layered file system that is used to run a container. According to Docker docs “Docker image consists of read-only layers each of which represents a Dockerfile instruction. The layers are stacked and each one is a delta of the changes from the previous layer.”
Images are stored locally and in the image registries (i.e. DockerHub), from which they can be pulled when needed.
The images are identified using the combination of repository and tag in the <repository>:<tag> form.
The repository structure is the [<registry>/][<user>/]<image name>. The registry can be ommitted if the image is hosted at DockerHub; the user can be ommitted if the image is verified or published by Docker.
The tag is a string identifying a version of an image. If omitted, the default tag value latest is applied.
For example:
gcr.io/google-samples/echo-node:1.0- the image atgcr.ioregistry from a usergoogle-samplesnamedecho-nodeand tagged1.0ubuntu- the image atdocker.io(DockerHub) registry from the official (void) user, namedubuntuand having alatesttag
What a container is
Container is the application running as the instance of the container image. In most cases it is a single process running in the isolated environment within the Docker Engine. During the lifetime of the process the container is running and is automatically stopped after the process is terminated.
The states of the containers and the transitions are very well described in the chart:
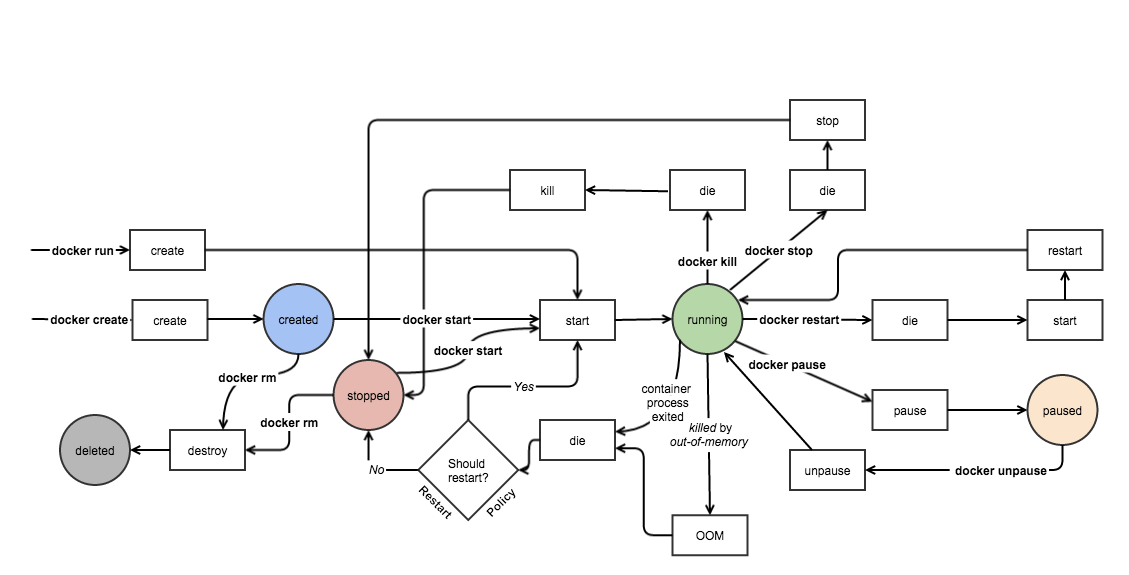
Source: http://docker-saigon.github.io/post/Docker-Internals/
The container should be treated as the stateless application instance, thus might be restarted and replaced anytime.
If needed, the persistent storage can be achieved by mounted volumes or by using the external storage or database services.
Docker tools
Below you can find the list of most commonly used docker command.
Image commands
docker pull <image> - downloads the image from the registry. It might require logging-in using docker login if the image is from the private repository.
docker image ls (shorthand: docker images) - lists all images on the machine.
docker image rm <image ID> (shorthand: docker rmi <image ID>) - removes the image.
It is convenient to provide the just the beginning part (a couple of symbols) of the ID (image ID, container ID etc.), i.e.:
$ docker image ls
REPOSITORY                                                 TAG                 IMAGE ID            CREATED             SIZE
node                                                       latest              d97e1f326ca9        3 weeks ago         906MB
node                                                       current-alpine      80a733d0cd8c        3 weeks ago         77.3MB
ruby                                                       2.5-alpine          d4adfc042285        5 weeks ago         54.4MB
alpine                                                     latest              5cb3aa00f899        2 months ago        5.53MB
hello-world                                                latest              fce289e99eb9        4 months ago        1.84kB

$ docker image rm fc
Untagged: hello-world:latest
Untagged: hello-world@sha256:6f744a2005b12a704d2608d8070a494ad1145636eeb74a570c56b94d94ccdbfc
Deleted: sha256:fce289e99eb9bca977dae136fbe2a82b6b7d4c372474c9235adc1741675f587e
Deleted: sha256:af0b15c8625bb1938f1d7b17081031f649fd14e6b233688eea3c5483994a66a3
In the example above the image hello-world which ID starts with ID fc is removed.
As the Docker images are built on top of other images it creates a layered file structure. These layers (commands triggering the filesystem changes) can be listed using command:
docker image history <image ID>
The image content can be exported (saved as tar archive) using a command:
docker image save <image> -o <file>
Container commands
docker container run <image> <cmd args> (shorthand: docker run ...) - runs the container from the image. Also automatically pulls (downloads) image if it’s not available locally. The image has an entry point command which is invoked when running command. It can have default argument list, but it can be overriden by the command arguments when running the container.
While docker container run command has many option keys, the most commonly used ones are:
-d- runs container in the detached mode-it- these are separate keys-i(interactive) and-t(pseudo-TTY) usually used together to provide the interactive TTY-v- mounts the volume from the host machine to the container. When used as-v /path/to/dir/on/host/machine/:/dir/in/containerthe volume persists.-e- sets the environment variables in the container-p- maps the TCP port from the container to the host machine. I.e.: setting the value"8080:4000"will expose the port4000from the container to the host machine as8080port, so it could be accessed as this port within the host’s loopack network interface (localhosthost /127.0.0.1IPv4 address)
For example, the following command runs bash in the Ubuntu distribution from a Docker container:
docker container run -it ubuntu /bin/bash
The interactive container can be detached using the key combination Ctrl+P Ctrl+Q. The container’s interactive console can be attached again using the command:
docker container attach <container ID or name>
Alternatively, another process (bash in this example) can be executed and run as a separate TTY:
docker container exec -it <container ID or name> bash
While it is easy to run the single container from the command line, it is less convenient to do so for the services runningas as multiple related containers. Also, it is a usual case when containers need to communicate with each other - then the separate Docker configuration of Network is needed. Such imperative way of running is also error-prone. The preferred declarative way of defining the desired configuration of images, networks, building them, running and stopping containers is using the docker-compose utility.
Other common container commands:
docker container ls (shorthand: docker ps) - lists the running containers. The key -a shows all (including stopped) containers.
docker container rm <container ID> (shorthand: docker rm ...) - removes the container. The key -v also removes the volumes.
docker container inspect <Container ID> - shows the information about the container
docker container prune - removes the stopped containers
System commands
docker system df - show the summary of size used by the images, containers, volumes
docker system info - shows the system information
docker system prune - removes stopped containers, networks, dangling images
docker system prune --volumes - removes all volumes
Building images with Dockerfile
Docker images are built using the instructions written in the file, usually named Dockerfile. The most common instructions:
FROM- base image. THe new imagae will be based on top of this imageRUN- runs the command to build the image. MultipleRUNcommands can be definedCOPY- copies the file or the directory from local machine to the container image. The list of ignored path patterns can be defined in the.dockerignorefile. The key--from=<image>can be used to copy the files from the existing image or during the multi-stage builds.WORKDIR- the directory where the initial run command should be run fromEXPOSE- the TCP port which the containerized applications listens toENV- environment variable (in the form ofKEY="value")VOLUME- sets the moundpointENTRYPOINT- the initial command to be run during the container startCMD- default command-line parameters passed to the entrypoint command. They can be overriden during thedocker container run ...commandLABEL- adds container label. The labels are used for filtering the containers, images etc. The label keys are named using the reverse-domain notation. Multiple labels can be added.HEALTHCHECK- defines the criteria for checking the health of a container. I.e.:HEALTHCHECK CMD curl -f http://localhost/ || exit 1. The command is run inside the container. The interval, timeout, start period and number of retries can be configured.
The best practices and examples on writing Dockerfile
The image is build using the command:
docker build -t <image>:<tag> <path> - builds the Docker image from the instuction defined in the Dockerfile file in the path (path can be . if the command is run from the same directory as Dockerfile). The different file name can be provided using -f key. Multiple tags can be provided. CPU and memory limits can be set using -c and -m keys respectively.
Multi-stage builds
It is useful to separate the images for development and building the application and the ones running in production. The main benefit is the smaller size of the image running code in production.
Multi-stage builds allow defining aliases for builds and copy the content from the generated temporary image to another one, i.e.:
FROM <build image> AS <alias>
... (image build instructions)

FROM <runtime image>
COPY --from=<alias> /path/to/the/files/at/built/image /path/to/runtime/files
The --from= parameter can also be used to copy the files from the external image, i.e.: COPY --from=nginx /etc/nginx/nginx.conf /nginx.conf.
More info on Multi-stage builds: https://docs.docker.com/develop/develop-images/multistage-build/.
Pushing image to the registry
The built images may be pushed to the online image registry for later reuse.
It is needed to authenticate to the registry first:
docker login [server] - authenticates to the DockerHub or other registry if server is provided.
The authentication information is stored in ~/.docker/config.json uncencrypted (!) or in another more secure credential store.
After authentication the image can be pushed using the command:
docker push <image>
Docker compose
Compose is a tool for defining and running multi-container Docker applications. With Compose, you use a YAML file to configure your application’s services. Then, with a single command, you create and start all the services from your configuration. (source)
Docker Compose can be installed by following the installation instructions.
docker-compose.yml file is used to declaratively define the services that are built and run as Docker containers. The service is an application which runs either as a single container or is replicated to multiple containers.
The services can deployed and managed using the Orchestration tool “Docker Swarm”. Also, there are other container orchestration and cluster management tools like Kubernetes, Mesos, Rancher that can be used to manage the services. Kubernetes is pretty popular now and there are number of vendors providing Kubernetes as a Service therefore it is worth considering container orchestration using Kubernetes. Let’s keep the deployment topic for the next blogpost.
The docker-compose.yml contains the following structure:
- Version of the Docker Compose API specification, the configuration is compatible with
- Services configuration
- Networks configuration
- Volumes configuration
The sample file content:
version: '3' # API version

services:
  myservice: # Service name
    build: # Build section. The directives are applied when building the image
      context: .
      dockerfile: Dockerfile
    image: image:tag # The image which is used to tag the image during the build and to run the containers from
    volumes:
      - ".:/site" # Mounts current directory to the container
      - "dbdata:/path/to/db/files" # Reusable volume among the containers
    ports:
      - '8080:4000' # Exposed port mapping. This will expose the TCP port 4000 from the container to the host machine as 8080 port
    networks:
      - my-network # Network name. Needed for multiple servers to communicate between each other

networks:
  my-network:
    driver: overlay

volumes:
  dbdata:
Docker-compose commands
These are the most common docker-compose commands. The commands should be run in the same directory as the docker-compose.yml file location:
docker-compose up - runs the containers described in the services section. If needed, builds the images first (using the build section). The key -d runs the services in the “detached” mode (background).
docker-compose down - removes the running service containers
docker-compose build [<service>] - builds the image for all or defined services
docker-compose logs - shows the output from the containers
docker-compose ps - lists the containers
docker-compose stop - stops the containers (does not remove them)
docker-compose start - starts stopped containers
docker-compose rm - removes stopped containers
What’s next
While Docker is very popular, the other application container engine is rkt is very promising and worth attention. Also, it is conceptually closer to the very popular container orchestration system Kubernetes and Application Container specification by the Open Container Initiative.
The container orchestration and cluster management platforms(Docker Swarm, Kubernetes) are used to deploy and run the containers in production. Considering the existing and growing popularity or Kubernetes, it is likely to be the way to go further.